A table collects a list of entries, with one row for each entry and one column for each detail. Use a table whenever you'd otherwise send a client a spreadsheet to fill in, such as a list of bank accounts, staff, properties or transactions where every entry needs the same details.
You set what each column holds, so each column can be a different type: text, a date, a number or a file upload. Do not use a table for a long written answer. A single text question suits that better.
If each entry needs its own instructions, or the questions change from one entry to the next, a repeatable section fits better than a table. See Let clients repeat a section.
Add a table to a request
- Open Requests.
- Open the request you're building.
- Select Builder.
- Click Add a field and choose Table from the list of field types.
Add a column for each detail you want to collect. Each row is one entry your client fills in.
Choose what each column collects
Each column can be a different type, so one table can gather text, numbers, dates, currency, countries, dropdowns and file uploads side by side. New columns start as single line text. To change one:
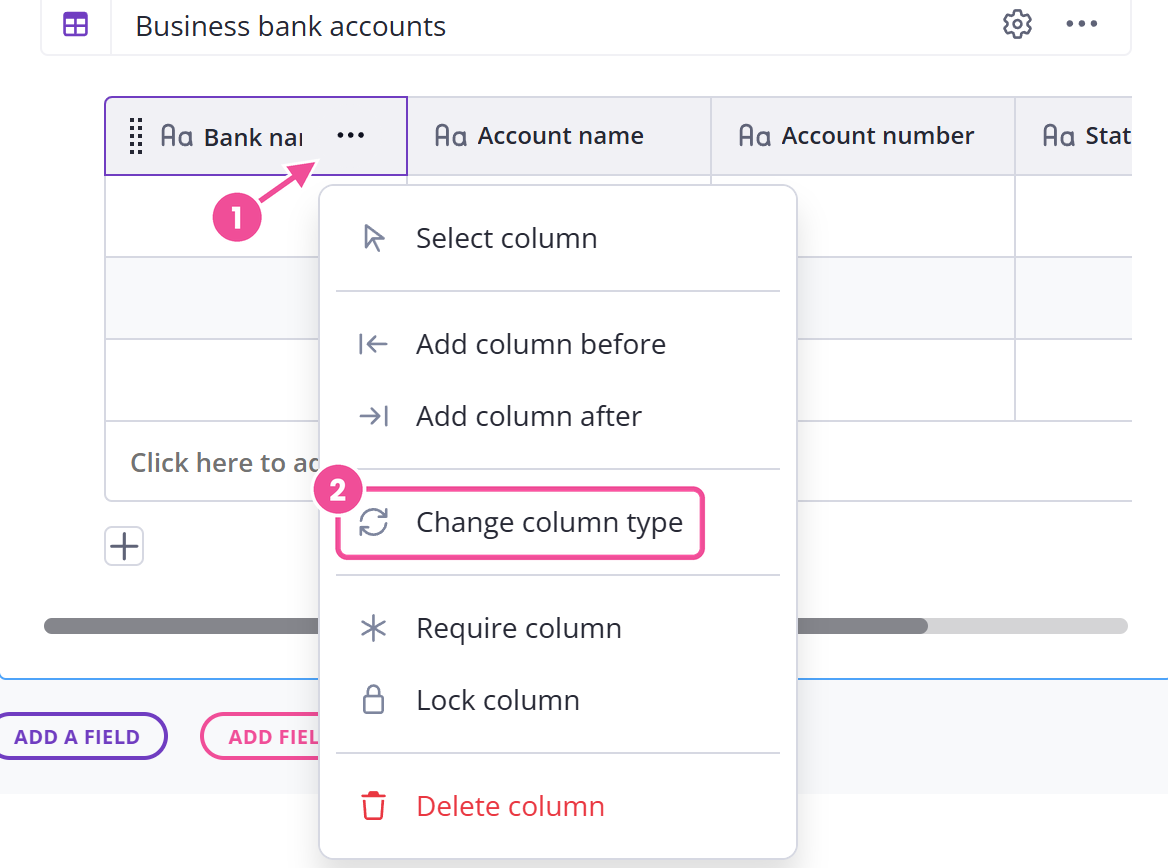
- Click the column's header, then click the dots to open its menu.
- Choose Change column type.
- Pick the type you want.
- For a country, currency or phone column, you can choose a default in Default Country, Default Currency or Default Country Code.
- Confirm.
Each cell in the column starts on the default you set, and your client can change it in any cell. A country column gives clients a searchable list of countries with flags.
For the full list of types and what each one collects, see Field types.
Make a column required
Open the column's menu and choose Require column to make clients fill it in. They have to complete every cell in every required column before they can submit the request. To make a column optional again, open the same menu and remove the requirement.
Lock a column so clients can only read it
Lock a column when clients should see a value but not change it, such as a reference number, a fixed rate, or an account name you've already filled in. Open the column's menu and choose Lock column. The column stays visible, with a padlock shown in its header, and clients can't change its cells. Choose Unlock column from the same menu to let them edit it again.
Let clients add their own rows
A new table already lets clients add their own rows, so they can enter as many entries as they have. If you want a fixed set of rows instead, select the table and turn off Allow additional rows in its options panel. Field options covers where those settings live.
Paste from a spreadsheet
Copy the cells from your source, then paste them into the table. To paste everything you copied, click a single starting cell first, and the data fills down and across from there. Select a range of cells before you paste, and only those cells are filled.
If you paste more rows than the table has, the extra rows are added only when the table lets clients add rows. If you paste more columns than it has, Content Snare asks you to confirm before adding them.
Clear a cell, or delete a row or column
To clear what's in some cells, select them and press Delete or Backspace. The cells empty and the row stays in place. To remove an entire row or column, use its menu and pick Delete row or Delete column. Both take out the row or column and everything in it. If you delete something by mistake, press Ctrl+Z right away to undo it.
To change the order of rows or columns, hover over the handle at the left of the row or the top of the column and drag it into place.
Keyboard shortcuts
Tables use the same keyboard shortcuts as a spreadsheet for moving between cells, selecting, copying and pasting. For the full list, see Keyboard shortcuts.