Switch between views
Open Requests, Clients, Team or Templates and use the View menu at the top. All four offer Grid and List. Requests add a third, Board.
Grid arranges entries as cards. List shows them as rows, which is easier to scan once you have a lot to work through.
Each page remembers your view
Content Snare remembers whatever view you had a page in and shows it again next time. Switching your clients to Grid doesn't change how your requests look.
On a narrow browser window, the View menu shrinks to an icon at the top of the list and still offers Grid and List. If you had your requests on Board, they show as a grid until you widen the window again.
Requests in List view
In List, each request is a row with its name, client, due date and status. On a wide window, the list also shows:
- Progress shows how many of the request's questions have been answered. Hover over it to see how many are approved, waiting for your review and still to answer.
- Stage shows the request's stage on the board. Administrators and Editors can change the stage here.
Click a column heading such as Due date, Status or Progress to sort. The list is always grouped, so each group sorts on its own.
Requests with the Waiting for Approval status are tinted, so you can see which ones need reviewing. Their cards in Grid and Board are tinted too.
A badge after a request's name shows how many unread comments it has. Click the badge to go to the first one.
Hover over a row for quick buttons such as Edit, Quick settings and Review. Which ones you see depends on the request's status. Everything else is in the three-dot menu at the end of the row.
Board view
Board lays your requests out as cards in columns called stages, so you can move each one through the steps of your own workflow. For example, if several people approve a request in turn, you can give each step its own stage.
Everyone on your team shares one set of stages, and your clients never see them. New accounts start with three stages, which you can change:
- In Progress
- Under Review
- Approved
Uncategorized always comes first and holds every request without a stage. To hide it, click Uncategorized: Shown above the board.
Move a request to another stage
Administrators and Editors can move a request to another stage in any of these ways:
- On the board, drag its card into another stage.
- In Grid, click the stage on the request's card and pick another. In List, do the same in the Stage column.
- From any list of requests, open the request's three-dot menu, choose Move to stage and pick a stage.
On the board, drag a card up or down to change its place in the stage, or choose Move to top or Move to bottom from its three-dot menu.
Add, rename, protect or delete a stage
Only Administrators can change stages, either on the board or on the Request Stages page in Settings. You can have up to 30 stages, plus Uncategorized.
On the board
Every stage has a menu beside its name. Open it to:
- Rename the stage
- Protect stage, so Content Snare asks you to confirm before a request moves in or out
- Add new request, which creates a request already in that stage
- Delete the stage
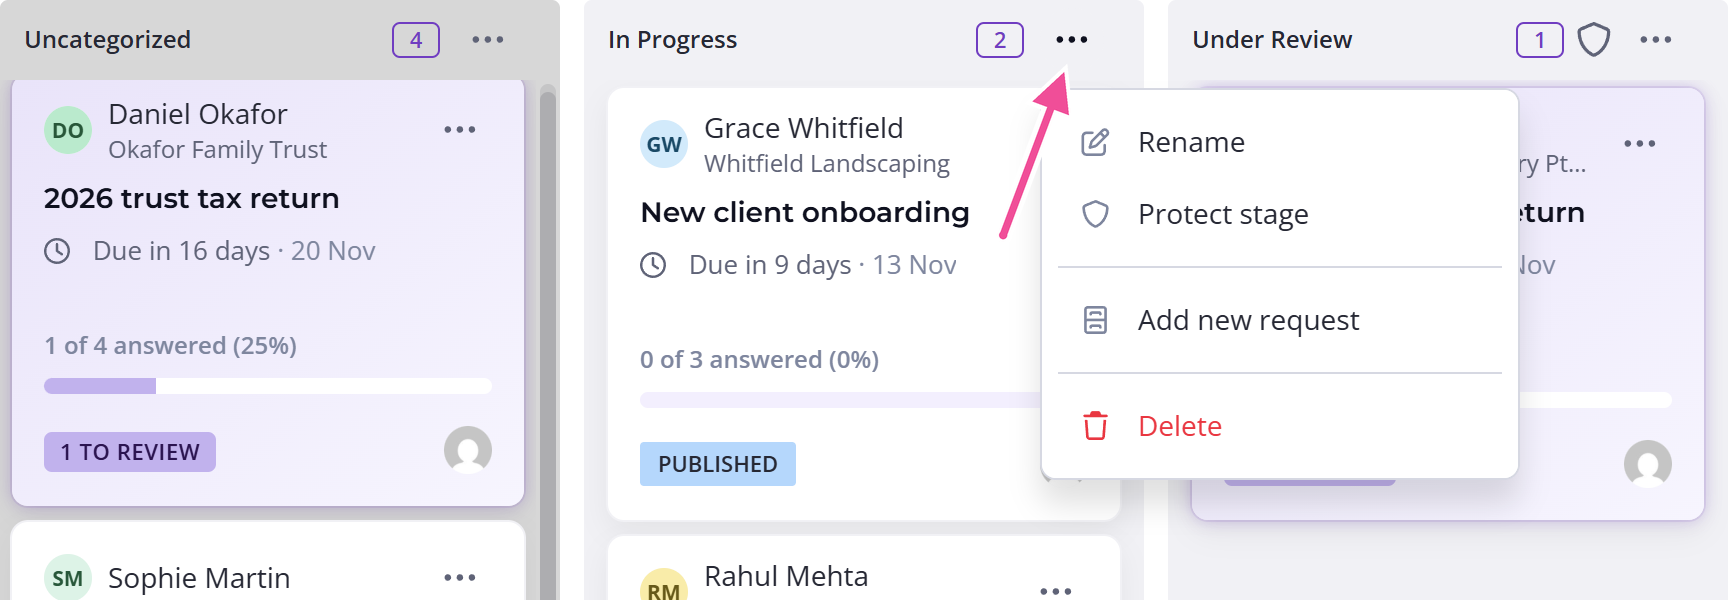
Once a stage is protected, that option changes to Remove protection.
To add a stage, click Add stage at the right end of the board and choose New stage. It appears at the end, ready for you to type its name. To change the order, drag a stage by its heading.
On the Request Stages page
- Click your avatar in the top right and choose Settings.
- In the menu on the left, under Company, choose Request Stages.
From there:
- Click New stage at the bottom of the list to add a stage.
- Open a stage's three-dot menu to rename it, move it up or down, or delete it.
- Drag a stage by its handle to change the order.
- Turn on a stage's Protected switch to protect it.
You can also open this page by choosing Manage stages from the board's Add stage menu, or from the bottom of the list that opens when you click a request's stage.
What happens when you delete a stage
When you delete a stage, its requests move to Uncategorized. If the stage holds any requests, Content Snare asks you to confirm first. You can't undo a delete, and adding the stage again doesn't move the requests back.
What protecting a stage does
Once you protect a stage, Content Snare asks you to confirm before you move a request into or out of it. That includes dragging a card on the board, Move to stage, and changing the stage on a card or row. Click Yes, allow this operation to go ahead. Moving cards within the stage doesn't need confirmation.
Anyone who can move requests can confirm the move. A protected stage shows a shield icon beside its name.