You might mean one of two things here. Content Snare can export a list of your requests to a spreadsheet in one step, but that list does not include the answers your clients gave. To collect the answers from several requests, you connect Content Snare to Zapier and Google Sheets.
Export a list of your requests
- Open Requests.
- Open the actions menu above the request list.
- Choose Export full request list.
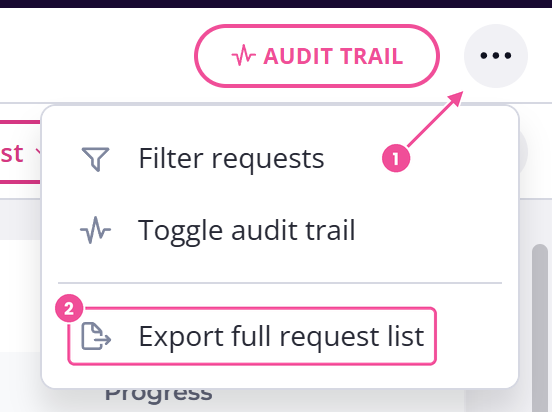
That downloads a CSV with one line for each of your draft, published, completed and archived requests. Scheduled requests and templates are not in it.
Each line shows:
- The request's name and its client.
- The due date and the status.
- How many questions are approved, completed and still to do.
- The owner.
- The template it was built from.
- A link to open it.
This export does not include answers or files uploaded by your client.
If all you need is an overview of your requests and where each one stands, this is enough. To pull the answers out of several requests at once, use the recipe below. To export a single request with its answers and files, see Export a request.
Export the answers from several requests
There is no one-step version of this, so you build it once with Zapier and then it runs on its own. Content Snare sends each completed request to Zapier through a webhook. A script turns the answers into columns, and Google Sheets adds a row. After that, every request you complete adds a new row automatically.
Every request you export this way has to be built from the same template. In the recipe, each question becomes its own column, named after its page, section and question. If two requests contain different questions, they produce different columns and the sheet no longer lines up. Build them all from one template and the columns stay put.
Nothing checks this for you. The webhook fires on every request you complete, whichever template it came from. So while the Zap is on, either complete only matching requests, or add a Zapier filter that drops the rest before the code step.
You need two things before you start:
- An Administrator account in Content Snare. Only Administrators can add a webhook.
- A paid Zapier plan. The recipe uses a Code by Zapier step, which Zapier only includes on its paid tiers.
There is no Content Snare plan to upgrade for this. The only paid part is Zapier itself.
Zapier changes its own screens from time to time, so follow the feature names below (Catch Raw Hook, Code by Zapier, Create Spreadsheet Row) rather than matching every button exactly.
Step 1: Create the trigger in Zapier
In Zapier:
- Start a new Zap.
- For the trigger, choose Webhooks by Zapier, then the Catch Raw Hook event.
- Copy the webhook URL Zapier shows you.
Step 2: Add the webhook in Content Snare
In Content Snare:
- Click your avatar in the top right and choose Settings.
- Open Integrations.
- Choose Webhooks.
- Select Add a new webhook.
- Paste in the URL from Zapier.
- Tick Request Completed, then save.
The Request Completed event is the one to use. It is one of the few webhook events that send the whole request, including every page, section, question and answer. Other events, including Request Updated, send only the request's own details and its client, with no answers. Request Completed fires when you mark a request complete.
Step 3: Complete a request to send the first set of data
Zapier needs to see a real payload before it can build your columns, so go and complete a request:
- Open Requests.
- Open the request.
- Answer a few of its questions.
- Approve the answers.
- Mark it complete from the request’s actions menu.
That fires the Request Completed webhook.
Do this with a dummy request you set up and sent to yourself, not a live client's. Whether you complete a request or use Content Snare's Test button on the webhook, real answers go to Zapier, not sample data.
Step 4: Create your Google Sheet
Make a Google Sheet with a column for every value you want to keep. That means the request details you care about, plus one column per question. Set the headers up now, because Zapier reads your columns when you connect the sheet in the last step.
Step 5: Build the rest of the Zap
Back in Zapier:
- On the webhook trigger, run the test. It pulls in the request you completed a moment ago.
- Add a Code by Zapier action and choose the Run Javascript event. In the input fields, type
dataon the left, and on the right choose the trigger's Raw Body. - Clear the code box and paste this in:
const data = JSON.parse(inputData.data);
output = {};
// Fill in fields
output['Request ID'] = data.id;
output['Request Name'] = data.name;
output['URL'] = data.url;
output['Due Date'] = data.due_date;
output['Folder'] = data.folder_name;
output['Share Link'] = data.share_link;
output['Template Name'] = data.request_template_name;
output['Owner'] = data.owner_name;
output['Client Name'] = data.client.full_name;
output['Company Name'] = data.client.company_name;
output['Email'] = data.client.email;
output['Phone'] = data.client.phone;
data.pages.forEach(page => {
  page.sections.forEach(section => {
    section.fields.forEach(({ name, values }) => {
      output['Values ' + page.name + ' ' + section.name + ' ' + name] = values.join(', ');
    })
  })
})
This reads the request Content Snare sent and builds an output for every question, named after its page, section and question. You can paste it in as it is.
Two of those columns are worth knowing about before you map them. Request ID is Content Snare’s own short code for the request, not a row number you set. Share Link is empty unless sharing by link is turned on for that request.
- Test the code step.
- Add a final action, Google Sheets, with the Create Spreadsheet Row event. Connect your Google account, choose the sheet and worksheet you made, and match each column to the value it should hold from the code step. Run the test, check the new row appears in your sheet, then turn the Zap on.
What ends up in your spreadsheet
The answers on a completed request go to Zapier.
A file-upload question comes through as a download link, not the file itself. That link needs no login and never expires, so anyone who can open the sheet can open those files. Keep the sheet private.
The Zap adds a new row each time you complete a request. Reopening a request and completing it again sends another webhook, so you get a second row. To avoid duplicates, use the Request ID as your key and remove duplicate rows.