Who can create and send requests
Only Administrators and Editors can build a request and publish it. Reviewers and Viewers can't, so if you can't find a way to start a new one, ask an Administrator to change your role.
Start from a template or from scratch
On your dashboard, click Add new request. You can pick a ready-made template, or start from scratch.
The Template Gallery holds the built-in templates, sorted into categories like accounting, design, and legal, with a search box to find one by name. Once you save templates of your own, they appear under My Templates at the top of the list. If nothing fits closely, pick the nearest one and edit it, or start from scratch.
Hover a template to preview it, then click Use This Template. Content Snare makes a copy for this request, so anything you change stays with the request and leaves the template alone. To build with no template, click Start from scratch and name your request.
Name the request
The Give this Request a name box is the first field on the Essentials page. Whatever you type here shows on the request your client opens, and the default emails use it too, so name it for them, not only for you. If you started from a built-in template, this box already shows the template's default name, which stays until you change it.
For a naming system that keeps requests easy to find later, see name your requests and folders.
Write the instructions
Instructions are the first thing your client sees when they open the request, so treat them like a welcome page. Tell your client who you are, what you need, and how to work through the request. You can add text, images such as your logo, and a video.
Every template comes with default instructions. If your client already knows Content Snare, you can switch Enable Request Instructions off, though it's better to leave them on.
Set the owner and folder
On the Essentials page, click Show additional settings to reach the owner and folder. The owner is the person on your team responsible for the request. It defaults to you. Whoever is set as owner receives the request's notifications, and reminder emails to your client come from them. Use Select the owner of this Request to hand it to someone else when you're setting up a request on their behalf.
Every request is in a folder. Pick one with Select a folder to organize your Request, or leave it in the Default Folder. Folders are a way to organize your requests so they're easier to find again.
Setting an owner also lets you and your team filter the requests dashboard by owner, which makes it easier to see who is responsible for what when several people are managing requests at once.
Add your questions
Next comes the builder, where you add the pages, sections and questions your client answers. Add questions to a request covers that step in full.
Choose the client
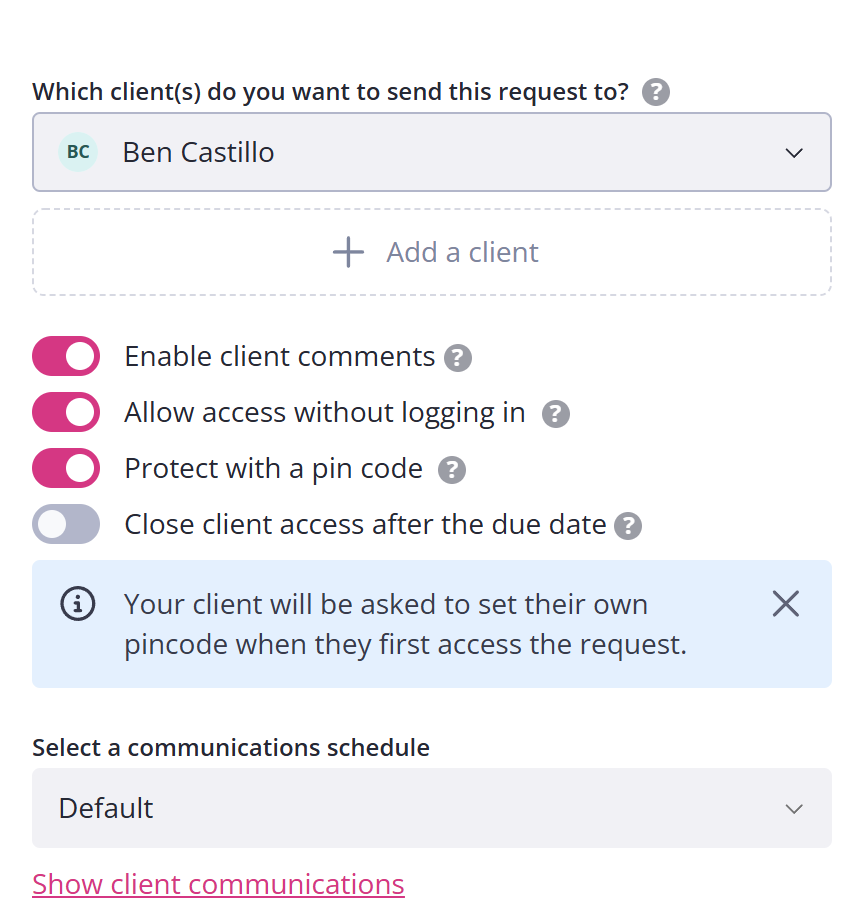
With your questions in place, open Publish Settings to send the request. Start by choosing who receives it under Which client(s) do you want to send this request to?. Click Add a client to open your client list and pick a client. A request needs at least one client before it will publish.
To send to someone new, click Create new client at the bottom of that list and fill in their details. Name and email are required; a photo, company name, and phone number are optional. Add the phone number if you plan to use SMS reminders, since those only reach a client who has a valid one on file.
To add more than one client, click Add a client again for each one, up to 10 on a single request. Everyone on the request then shares it and can see each other's answers, so add several clients only when they're meant to work on it together. To collect from people separately, send each their own request. For a batch of clients getting the same thing, create requests in bulk.
Comments and access
Switch on Enable client comments if you want your client to ask questions about individual fields. See comments for how they work.
The publish screen also has the client access settings, Allow access without logging in and Protect with a pin code. For what each one does and when to use it, see client access and security settings.
That setting also decides which link your client gets in the emails Content Snare sends them.
- Allow access without logging in on. They get the request link itself, and it opens the request without a sign-in.
- Off, with magic links on for your account. They get a magic link that signs them in. It lasts 4 hours, so a client who clicks it later lands on the sign-in screen, where one button sends them a fresh one.
- Off, with magic links off. They get an invitation link and sign in with their email address and password.
Switch on Close client access after the due date and your client's access ends on the due date, at the time of day you published the request, in your organization's time zone. Request expiry covers what your client sees and what happens to the request.
Set the due date
A due date is required, and Content Snare fills one in for you. Change it under When is the request due? if the date it picked isn't the deadline you want.
Choose a communications schedule
Before you send, pick how Content Snare emails and texts your client, using Select a communications schedule. Every account starts with two schedules. Default sends the full set of reminders. No automatic reminders still sends the first email and the rejection and comment notifications, but not the chasing reminders.
There's also Don't send any messages to my client, which turns off every email and SMS. Pick that one only when you're sending the request link to your client yourself and you don't want them to get any email from Content Snare at all, including the notifications when you reject an answer or leave a comment.
To see exactly what a schedule sends, click Show client communications. Each message opens a preview, though you can't edit them from here. You can also build your own schedules; see reminder schedules.
Send now, schedule, or save as a draft
To send the request straight away, click Publish & Send. To save your settings without sending, choose Save settings and leave the request as draft and come back later. To send it automatically at a set time, use Schedule request and pick the date and time.
If this is your very first request and it won't publish, check that you've confirmed your email address. Content Snare sends a confirmation link when you sign up, and your first request won't go out until you click it. See confirm your company email address if you can't find it.